Grade Level: 7–8
Students will be introduced to the life and art of Andy Warhol as a way of considering photography as a self-portrait medium. After viewing and discussing other artists’ photographic self-portraits, students will create their own digitally manipulated photographic self-portrait and then write a poem to describe the point of view taken in their digital work of art.

Andy Warhol
American, 1928–1987
Self-Portrait, 1986
synthetic polymer paint and silkscreen ink on canvas, 203.2 x 203.2 cm (80 x 80 in.)
National Gallery of Art, Gift of the Collectors Committee
Curriculum connections
Materials
Warm-Up Questions
How do you think this self-portrait was made? Why do you think he included four images of himself rather than one?
Background
Andy Warhol became fabulously famous for his 1960s pop art. He produced big, bold images of the popular, the famous, and the stuff of our consumer society. His multi-image portraits of famous people—Marilyn Monroe, Elvis Presley, Jacqueline Kennedy—and of common products—Campbell's soup cans, Brillo pad boxes, Coca Cola bottles—are among the most powerful icons of twentieth-century American art.
Andy Warhol was born Andrew Warhola, the son of Czechoslovakian immigrants, in 1928. He grew up poor (during the Depression) outside Pittsburgh, Pennsylvania, with his parents and two brothers. As a child, Warhol (he later dropped the final "a") recalled having a few friends but also feeling "left out." He suffered briefly from a nervous disorder that caused muscle spasms and kept him isolated. He liked spending time on his own, coloring, taking snapshots with a small camera, and even making films with a movie camera given to him by his mother.
After graduating in art from Carnegie Institute of Technology in 1949, he moved to New York City, where he would have quick success as a commercial artist. He designed window displays, illustrated magazine articles, and drew record album jackets. In the 1960s, Warhol decided to abandon commercial art to focus on making serious visual art. While he hand-painted his first works, he soon developed a silk-screen process that allowed his staff of assistants to mass-produce the startling images of consumer products and brilliant movie star portraits. These works took the art world and the public by storm. In this self-portrait, he used four photographic images of himself (with his trademark “shocked” hair) and silk-screened them, off-kilter, onto a 6-foot square canvas. The result is four big heads, set in supercharged pink and yellow against a glossy, dense black background. The effect is intense and unsettling.
Guided Practice
Warhol said he was “deeply superficial” (is that possible?) and that there was absolutely nothing behind his work. Do you think his statements fit with his self-portrait? Is it superficial?
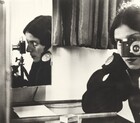
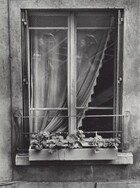
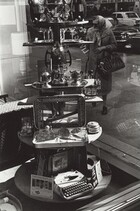
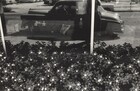
Warhol wasn’t the only artist nor the first to make unusual and thought-provoking self-portraits with photographic images. In preparation for the activity, view the slideshow below to see how two other artists—Ilse Bing and Lee Friedlander—manipulated photographs to say something about themselves. Have students identify how the following choices made by each artist express their unique self-image:
Slideshow: Bing & Friedlander: Photographic Self-Portraits
Activity
In this activity, students will start with a photo of themselves and then use imaging software to apply special effects and alterations:
Here’s an example of a student’s work of art:

Benjamin Kass,
Photograph by Al Garnache
Using a digital camera and special graphics-editing effects, Ben created his self-portrait. He gave some thought to the pose he wanted when he was photographed.

Wolf by Day
by Benjamin Kass
Next, Ben manipulated his digital portrait with an image-editing program (such as Adobe Photoshop). He experimented with special-effects filters until he arrived at the color scheme he wanted. Using a smudge tool, Ben created a fierce appearance. To elongate the jaw, he used an oval select tool to isolate and copy the area around the mouth. He then pasted it to a new layer, so it could be worked on without affecting the rest of the picture. He stretched and smudged the mouth until the desired effect was achieved. Finally, he used the brush-tool to paint the eyes.

Wolf by Night
by Benjamin Kass
Ben continued to experiment with filters to change the color scheme. The finished product looks like a wolf-man from a 1950s horror film!
Extension
After printing out their finished self-portraits, have students compose a poem based on their digital self-portrait using the “Write an ‘I Am’ Poem” worksheet. Remind students that the thoughts expressed in their poems should be reflected in the image they created in their digital self-portraits.
VA:Cr1.2.7 Develop criteria to guide making a work of art or design to meet an identified goal.
VA:Cr2.1.7 Demonstrate persistence in developing skills with various materials, methods, and approaches in creating works of art or design.
VA:Cr2.3.7 Apply visual organizational strategies to design and produce a work of art, design, or media that clearly communicates information or ideas.
VA:Cr3.1.7 Reflect on and explain important information about personal artwork in an artist statement or another format.
VA:Re7.2.8 Compare and contrast contexts and media in which viewers encounter images that influence ideas, emotions, and actions.
VA:Re8.1.8 Interpret art by analyzing how the interaction of subject matter, characteristics of form and structure, use of media, art-making approaches, and relevant contextual information contributes to understanding messages or ideas and mood conveyed.
Take a picture with a virtual camera and experiment with editing tools in NGAkids Photo Op (or available for free-loan on CD)
Listen to a podcast “In the Darkroom: Photographic Processes before the Digital Age” (11:46 mins.)